Exercises (3162)
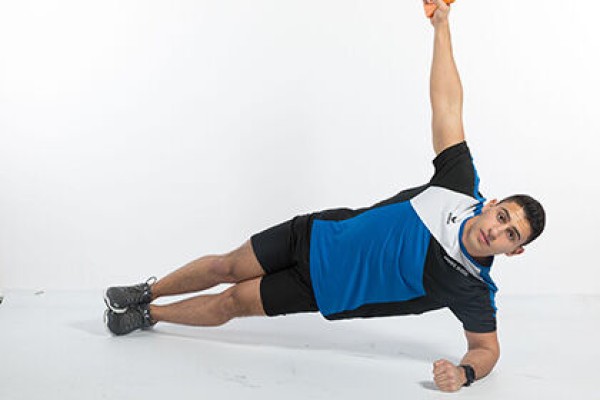
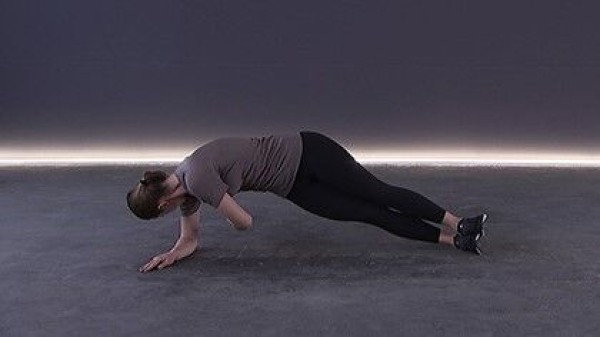
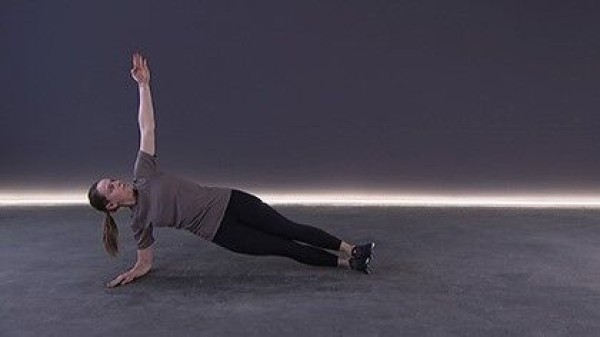
Rotation of the upper body in lateral forearm support (left) ► rotational lateral pillar bridge / side bridge
Power
Individual work


Side support on the (left) forearm and vertically extended upper arm, looking upwards, bring the upper arm under the body and back to the starting position, accompany the movement with your head (looking down from above).
Attention:
Pelvis remains stable.
Lighten:
Knees on the floor.
Harden:
Additional weight (for the free arm); unstable base (possible for both the supporting arm and the legs).
1 weight cuff/dumbbell ► making the exercise more difficult (additional weight)
1 ball/1-2 balance cushions/1 balance board ► making the exercise more difficult (unstable surface)
Rotation of the upper body in lateral forearm support (left) ► rotational lateral pillar bridge / side bridge
Power
Individual work

Side support on the (left) forearm and vertically extended upper arm, hold the pistol in the free hand, look towards the weapon, bring the pistol under the body and back to the starting position, accompany the movement with the head (look from top to bottom).
Attention:
Pelvis remains stable.
Lighten:
Knees on the floor.
Harden:
Instable support (possible for both the supporting arm and the legs).
1 pistol (neutralised)
1 ball/1-2 balance cushions/1 balance board ► Make the exercise more difficult (unstable surface)
Rotation of the upper body in lateral forearm support (left) ► rotational lateral pillar bridge / side bridge
Power
Individual work


Side support on the (left) forearm and vertically extended upper arm, hold the dumbbell in your free hand, look towards the weight, bring the dumbbell under your body and back to the starting position, accompany the movement with your head (look down from above).
Attention:
Keep your pelvis stable; keep the shoulder of the supporting arm above your elbow.
Lighten:
Knees on the floor.
Harden:
Stable support (possible for both the supporting arm and the legs).
1 dumbbell
1 ball/1-2 balance cushions/1 balance board ► Make the exercise more difficult (unstable surface)
Rotation of the upper body in lateral forearm support (left) ► rotational lateral pillar bridge / side bridge
Power
Individual work


Side support on the (left) forearm and vertically extended upper arm, feet on the balance board, look towards the free arm, bring the playing arm under the body and back to the starting position, accompany the movement with your head (look from top to bottom).
Attention:
The pelvis remains stable; keep the shoulder of the supporting arm above the elbow.
Lighten:
Without an unstable base.
Harden:
Instant base for the supporting arm as well; hold additional weight in the free hand.
1 balance board
1 ball/1-2 balance cushions/1 balance board ► Make the exercise more difficult (unstable surface)
1 dumbbell ► Make the exercise more difficult (additional weight)
Rotation of the upper body in lateral forearm support (right)
Power
Individual work
Side support on the (right) forearm and vertically extended upper arm, looking upwards, bring the upper arm under the body and back to the starting position, accompany the movement with your head (looking down from above).
Attention:
Pelvis remains stable.
Lighten:
Knees on the floor.
Harden:
Additional weight (for the free arm); unstable base (possible for both the supporting arm and the legs).
1 weight cuff/dumbbell ► making the exercise more difficult (additional weight)
1 ball/1-2 balance cushions/1 balance board ► making the exercise more difficult (unstable surface)
Rotation of the upper body in lateral forearm support (right) ► rotational lateral pillar bridge / side bridge
Power
Individual work


Side support on the (right) forearm and vertically extended upper arm, hold the pistol in the free hand, look towards the weapon, bring the pistol under the body and back to the starting position, accompany the movement with the head (look from top to bottom).
Attention:
Pelvis remains stable.
Lighten:
Knees on the floor.
Harden:
Instable support (possible for both the supporting arm and the legs).
1 pistol (neutralised)
1 ball/1-2 balance cushions/1 balance board ► Make the exercise more difficult (unstable surface)
Rotation of the upper body in lateral forearm support (right) ► rotational lateral pillar bridge / side bridge
Power
Individual work


Side support on the (right) forearm and vertically extended upper arm, hold the dumbbell in your free hand, look towards the weight, bring the dumbbell under your body and back to the starting position, accompany the movement with your head (look down from above).
Attention:
Pelvis remains stable; rotation of the upper body in lateral forearm support.
Lighten:
Knees on the floor.
Harden:
Instable support (possible for both the supporting arm and the legs).
1 dumbbell
1 ball/1-2 balance cushions/1 balance board ► Make the exercise more difficult (unstable surface)
Rotation of the upper body in lateral forearm support (right) ► rotational lateral pillar bridge / side bridge
Power
Individual work


Side support on the (right) forearm and vertically extended upper arm, feet on the balance board, look towards the free arm, bring the playing arm under the body and back to the starting position, accompany the movement with your head (look from top to bottom).
Attention:
Pelvis remains stable; keep the shoulder of the supporting arm above the elbow.
Lighten:
Without an unstable base.
Heavier:
Instable base also for the supporting arm; hold additional weight in the free hand.
1 balance board
1 ball/1-2 balance cushions/1 balance board ►Make the exercise more difficult (unstable surface)
1 dumbbell ►Make the exercise more difficult (additional weight)
Rotation of the upper body in side support (left) ► rotational pillar bridge
Power
Individual work

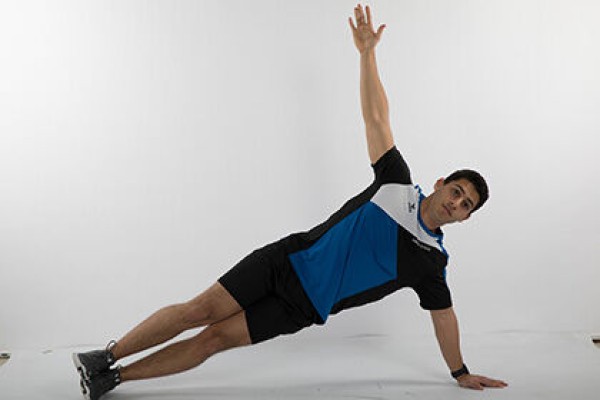
Lateral support with outstretched (left) arm, upper arm also outstretched (held vertically upwards), gaze directed upwards, bring upper arm under the body and back to the starting position, accompany the movement with the head (gaze directed downwards from above).
Attention:
Pelvis remains stable.
Lighten:
Knees on the floor.
Heavier:
Additional weight (for the free arm); unstable base (possible for both the supporting arm and the legs).
1 weight cuff/dumbbell ►making the exercise more difficult (additional weight)
1 ball/1-2 balance cushions/1 balance board ►making the exercise more difficult (unstable surface)
Rotation of the upper body in side support (left) ► rotational pillar bridge
Power
Individual work


Lateral support with the (left) arm extended, upper arm holding the dumbbell also extended (vertically upwards in a high hold), gaze directed upwards, bring the upper arm under the body and back to the starting position, accompany the movement with the head (gaze directed downwards from above).
Attention:
Pelvis remains stable.
Lighten:
Knees on the floor; no weight for the free arm.
Heavier:
More weight; unstable base (possible for both the supporting arm and the legs).
1 dumbbell
1 ball/1-2 balance cushions/1 balance board ►Make the exercise more difficult (unstable surface)
Rotation of the upper body in lateral support (right) ► rotational pillar bridge
Power
Individual work


Lateral support with the (right) arm stretched out, upper arm also stretched out (vertically upwards in a high position), gaze directed upwards, bring the upper arm under the body and back to the starting position, accompany the movement with the head (gaze directed downwards from above).
Attention:
Pelvis remains stable.
Lighten:
Knees on the floor.
Heavier:
Additional weight (for the free arm); unstable base (possible for both the supporting arm and the legs).
1 weight cuff/dumbbell ►making the exercise more difficult (additional weight)
1 ball/1-2 balance cushions/1 balance board ►making the exercise more difficult (unstable surface)
Rotation of the upper body in lateral support (right) ► rotational pillar bridge
Power
Individual work


Side plank with the (right) arm extended, upper arm holding the dumbbell also extended (vertically upwards in a high position), look upwards, bring the upper arm under the body and back to the starting position, accompany the movement with your head (look down from above).
Attention:
Pelvis remains stable.
Lighten:
Knees on the floor; no weight for the free arm.
Heavier:
More weight; unstable base (possible for both the supporting arm and the legs).
1 dumbbell
1 ball/1-2 balance cushions/1 balance board ►Make the exercise more difficult (unstable surface)
Rotation of the upper body in the seat (left) ► seated chop
Power
Individual work


Attach the elastic band to the wall bars (or e.g. a tree) at head height, sit upright on a long bench/swinging box top/chair at a 90 degree angle to the wall bars (to the tree), keep your legs shoulder-width apart, grasp the elastic band at shoulder height with both hands, move your upper body to the far (right) knee/thigh and return to the starting position, keeping your arms stable.
Caution:
Work from the torso and not with the arms.
Easier:
Choose an elastic band with less resistance.
Harder:
Choose an elastic band with greater resistance.
1 elasticated rubber band
1 wall bars/tree
1 long bench/1-2 swing box elements (incl. top section)/chair
Rotation of the upper body in the seat (right) ► seated chop
Power
Individual work


Attach the elastic band to the wall bars (or e.g. a tree) at head height, sit upright on a long bench/swinging box top/chair at a 90 degree angle to the wall bars (to the tree), keep your legs shoulder-width apart, grasp the elastic band at shoulder height with both hands, move your upper body to the far (left) knee/thigh and return to the starting position, keeping your arms stable.
Caution:
Work from the torso and not with the arms.
Lighten:
Choose an elastic band with less resistance.
Heavier:
Choose an elastic band with greater resistance.
1 elasticated rubber band
1 wall bars/tree
1 long bench/1-2 swing box elements (incl. top section)/chair
Rotation of the upper body while seated ► oblique crunch / rotational crunch
Power
Individual work
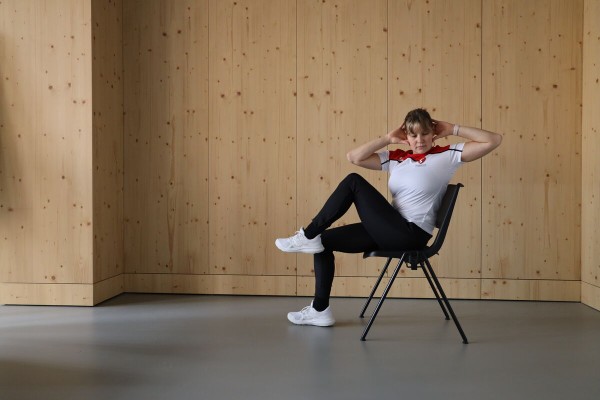
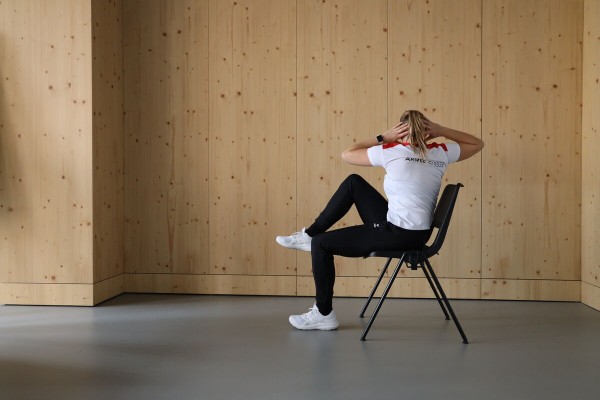
Sitting upright on a chair, cross your arms behind your head or place your hands on either side of your ear (elbows pointing to the side). Alternately lift one leg off the floor and move the elbow crosswise to the knee (bring it together approximately at the level of the navel). Raise the upper body to the starting position and lower the leg again. Switch sides after each exercise.
1 (office) chair
Rotation of the upper body in the seat ► russian twist / sitting twist / oblique twist
Power
Individual work


Sit on the floor, upper body leaning slightly backwards, legs bent and slightly raised, bent arms moving from one side to the other (touch the floor with your hands at buttock height), the upper body accompanies the movement.
Caution:
Only touch the floor with your buttocks, keep your upper body straight.
Lighten:
Place your legs on the floor; only hold the position (without moving your arms).
Lighten:
Hold additional weight in your hands.
Variation:
Legs bent on the floor, upper body slightly back, arms stretched out in front of you and move from one side to the other, upper body follows the movement.
2 weight cuffs/weight balls/1 (medicine) ball/weight disc/dumbbell ► Make the exercise more difficult (additional weight)
Rotation of the upper body in the seat ► russian twist / sitting twist / oblique twist
Power
Individual work


Sit on the floor, upper body leaning slightly backwards, legs bent and slightly raised, arms outstretched horizontally with the pistol in your hands and alternately bring the weapon sideways to the floor by rotating your upper body.
Caution:
Keep only the buttocks in contact with the floor, keep the upper body straight.
Lighten the load:
Lower the legs to the floor; hold the position only (without moving the upper body).
1 pistol (neutralised)
Rotation of the upper body in the seat ► russian twist / sitting twist / oblique twist
Power
Individual work


Sit on the floor, upper body leaning slightly backwards, legs bent and slightly raised, holding an object (e.g. helmet or ball) in your hands and moving from one side to the other (optionally touching the floor with the object at buttock height), the upper body accompanies the movement.
Caution:
Only touch the floor with your buttocks, keep your upper body straight.
Lighten:
Do not hold any additional weight in your hands; put your legs on the floor; only hold the position (without moving your arms).
Lighten:
Additional weight (e.g. place stones in your helmet or hold a rucksack).
1 helmet/(basket, medicine) ball
1 combat rucksack/tyre (PUCH)/3-4 stones ►Make the exercise more difficult (additional weight)
Rotation of the upper body in the seat ► russian twist / sitting twist / oblique twist
Power
Individual work


Sit on the floor, upper body leaning slightly backwards, legs bent and slightly raised, arms holding the (gym/medicine) ball in front of the body, arms (ball) moving from side to side, upper body accompanying the movement.
Attention:
Only keep your buttocks in contact with the floor, keep your upper body straight.
Lighten:
Place your legs on the floor; only hold the position (without moving your arms).
Lighten:
Additional weight on the arms/legs.
1 exercise ball, medicine ball, ball
2-4 weight cuffs ►to make the exercise more difficult (additional weight)
Rotation of the upper body in the seat ► russian twist / sitting twist / oblique twist
Power
Individual work


Sit on the floor, upper body leaning slightly backwards, legs bent and slightly raised, arms with assault rifle in hands stretched out horizontally (barrel pointing to the side or upwards) and by rotating the upper body bring the rifle alternately sideways to the floor.
Caution:
Contact the floor only with the buttocks, keep the upper body straight.
Easier:
Place your legs on the ground; only hold the position (without moving your upper body).
Variant:
Place your feet on the ground; hold the assault rifle with both hands on the hand guard so that the barrel is pointing upwards.
1 assault rifle (neutralised)
Rotation of the upper body in the seat ► russian twist / sitting twist / oblique twist
Power
Individual work


Sit on the floor, upper body leaning slightly backwards, legs bent and slightly raised, holding a medicine ball in your hands, which is alternately thrown to the floor on the left or right side at buttock height. The medicine ball is thrown in a large arc to the other side of the body.
Caution:
Only keep the buttocks in contact with the floor, keep the upper body straight.
Lighten:
Place your legs on the floor; do not hold any additional weight in your hands and only move your arms from side to side.
Heavier:
Add weight.
1 medicine ball
Rotation of the upper body in the seat ► russian twist / sitting twist / oblique twist
Power
Individual work


Sit on the floor, upper body leaning slightly backwards, legs bent and slightly raised, hold the medicine ball at the side of your body, throw the ball with both hands against the inclined mini-trampoline, catch the ball in front of your body and bring it to the other side. Then perform the exercise on the opposite side. The upper body always accompanies the movement (looking towards the ball).
Caution:
Only keep your buttocks in contact with the floor, keep your upper body straight.
Lighten the load:
Place your legs on the floor.
Lighten the load:
Add weight.
1 mini trampoline
1 medicine ball
Rotation of the upper body in the seat ► russian twist / sitting twist / oblique twist
Power
Individual work


Sit on the floor, upper body leaning slightly backwards, legs bent and slightly raised, 2-3 small weight discs (possibly of different weights) are placed next to the buttocks. Rotate the upper body to grasp a weight disc and place it on the other side of the buttocks (the head/gaze accompanies the movement). Then grab the next disc and move it to the other side. As soon as all the weight discs are stacked on top of each other again, the weights are transported back to the starting position.
Caution:
Only keep your buttocks in contact with the floor, keep your upper body straight.
Lighten:
Place your legs on the floor; only rotate your upper body from one side to the other without grabbing weights.
Lighten:
Heavier weight discs.
2-3 weight discs
Rotation of the upper body in the seat ► russian twist / sitting twist / oblique twist
Power
Individual work


Sit on the floor, upper body leaning slightly backwards, legs bent and slightly raised, grasp the weight (dumbbell, kettlebell or weight disc) with bent arms at stomach height, rotate the upper body to move the weight from one side of the body to the other (arm position - approx. 90 degree angle at the elbow joint - remains stable during the exercise).
Attention:
Keep your buttocks in contact with the floor, keep your back straight; always keep your head/gaze straight ahead.
Lighten:
Place your legs on the floor; less or no weight.
Heavier:
More weight.
1 weight disc/dumbbell/kettlebell
Rotation of the upper body in the seat ► seated upper body rotation
Power
Individual work
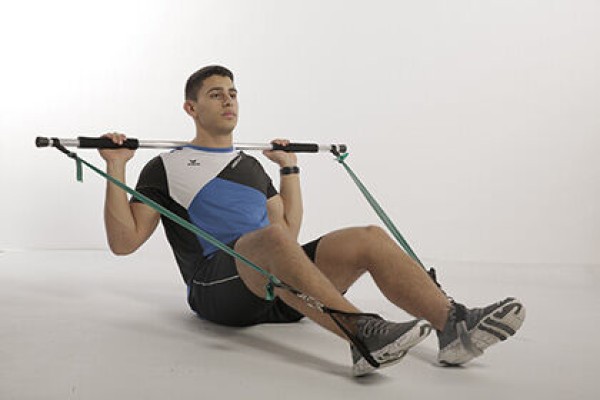

Sit on the floor, upper body tilted slightly backwards, legs slightly tucked in and heels up, feet in the loops, hold the gymnastics stick on your shoulders behind your head (back of hands pointing backwards), alternately move/rotate your upper body from one side to the other (head follows the movement).
Caution:
Keep your back straight (do not bend forwards).
Easier:
Choose less strong elastic bands; roll up the elastic bands less.
Harder:
Choose stronger elastic bands; roll up the elastic bands more.
1 gymnastic bar with elasticated straps