Exercises (3161)
One-legged jump to the side ► skater jump
Power
Individual work
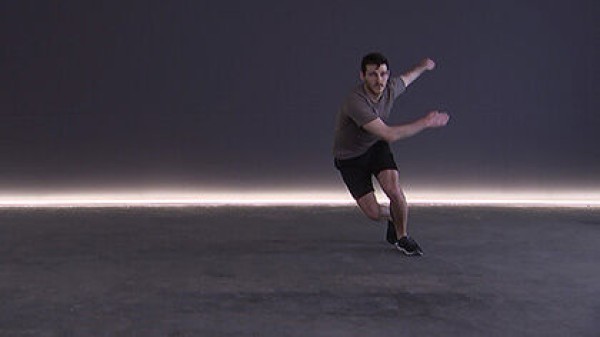
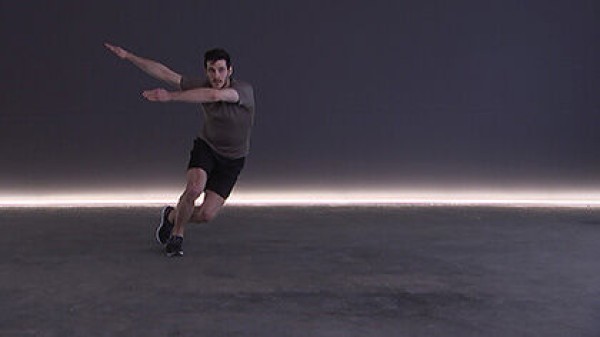
Stand on one leg with the leg slightly bent. Tilt your upper body forwards slightly and jump sideways onto the other leg. Hold your balance briefly in this position and then jump back to the other side.
Attention:
Keep your knees stable and always behind your toes.
Lighten:
Bend your knees less (greater angle); jump less to the side.
Harden:
Bend your knees more (smaller angle); hold additional weight (on your legs, shoulders, in front of your chest or in your hands).
2-4 weight cuffs/2 weight balls/dumbbells/1 weight vest/weight disc/sandbag/fighting rucksack ► Make the exercise more difficult (additional weight)
Jump ABC
Stimulate circulation
Group work
6-10 participants per group (3-5 participants per side)
The participants line up in groups facing each other at a distance of approx. 15-20 metres from each other. After the exercise, the participants line up again behind the opposite group.
Depending on the size of the group: start from both sides simultaneously or alternately.
Jump ABC exercises can be used as a warm-up or in the rehabilitation area as a training method for sports injuries (e.g. supination trauma, cruciate ligament injuries or muscular complaints).
Here are some of the most common jump forms that are used regardless of level:
Ankle jumps:
Both legs jump slightly forwards, but above all as high as possible (feet parallel and shoulder-width apart). Bend your ankles in the air (pull your toes upwards). The arms actively support the movement (bent arms swing upwards during take-off - approx. 90 degrees at the elbow joint; when landing, the forearms point diagonally downwards in front, in the flight phase diagonally upwards in front).
Bounce jumps:
Slightly offset stance (feet less than shoulder-width apart). Jump with both legs slightly forwards, but above all as high as possible, with the main momentum of the jump coming from the front leg. During the flight phase, bend the back leg and lift it upwards (raise the knee to the level of the navel). On landing, straighten the bent leg again and place the foot in front of the other (change foot position). In the next exercise, bend the back leg again (alternately lift one knee). In each case, the arm on the opposite side of the raised knee actively supports the movement (starting position: both arms hanging, bend the corresponding arm and move it upwards so that the hand is moved to the ear on the same side of the body).
Ins & Outs:
Double jumps slightly forwards (feet parallel), alternating between spreading the legs to the side for landing and jumping off and bringing them less than shoulder-width apart (alternating between straddle position and close stance). The arms actively support the movement (during the two-legged jump with legs together, the arms are only slightly bent behind the body - in the flight phase, the arms are brought forwards and bent so that the hands are in front of the chest when landing with the legs spread apart - when jumping from the straddle position, the arms are stretched and swung behind the body again - to restart the exercise sequence, the legs are closed again and the arms are behind the body again to catch momentum).
Sideways jumps:
Jump with closed legs from one side to the other (distance approx. 1 metre) with a slight forward movement. The arms actively support the movement (swing the almost outstretched arms forwards from behind the body when jumping off - during the flight phase, wave the arms so that the hands are in front of the chest, and for landing, stretch the arms again and bring them behind the body - for the next jump to the side, the arms are again behind the body to catch momentum).
Forward & backward jumps:
Both legs jump forward on the balls of the feet (feet parallel and less than shoulder-width apart), followed by a small hop backwards immediately after landing (feet in the same position). The entire exercise is performed on the balls of the feet only (no putting the heels down). The arms actively support the movement (during the take-off of the long forward jump, swing the almost straight arms forwards from behind the body - during the flight phase, bend the arms so that the hands are at head height when landing - during the take-off for the small backward jump, stretch the arms again and bring them behind the body - for the new take-off forwards, the arms are again behind the body to catch momentum).
No material required
Jump roll from a standing position
Floor and apparatus gymnastics


Both legs jump from a standing position with a slight forward lean (centre of gravity in front of the feet), slightly bent posture (C+) with body tension in the flight phase, arms stretched out in a high hold, hands placed shoulder-width apart, arms bent, head pulled towards the chest when rolling down (resting on the neck), squatting and standing up (without using the hands).
Variant:
Jump roll over a vaulting box element or the crouching partner.
The participants practise the movement form independently using series of pictures or based on the demonstration of the exercise by the instructor. The instructor (or a partner) gives feedback, provides support and checks the correct execution.
4 soft mats (small) ► indoor version
1 row
outdoor:
turf field
Relay
Increase pulse
Group work
4-5 participants per group
One runner runs around a turning point (e.g. colouring stick, marking cone or cone) or to the hall wall and back before sending the next runner onto the course.
Replacements: Run over a line (with a handshake), through a gate, around the group with a handshake (on the back), crawl through the legs of the next runner, hand over an object, etc.
Per group:
2 colouring sticks/marking cones/caps
Relay
Increase pulse
Partner work
4-6 participants per group. The group is again divided into teams of 2
The race starts in teams of two (binomials). The first binomials in the groups go around a turning point (e.g. a colouring stick, marker cone or cone) or to the hall wall and back before the next pair sets off. Each runner completes two runs in succession (with a different partner). In each case, the participant who has travelled longer hands over to the next runner (the first participant in the group completes their second run at the end of the relay). There are different forms of locomotion to cover the distance:
- One participant carries the partner (piggyback or gamstrage grip)
- One participant holds the partner by the feet (garette), who moves with the hands (possibly hands even on a pedalo).
- Two participants complete the course within a vaulting box element (chariot race)
- Two participants clamp an object between them (e.g. medicine ball, gym ball or frisbee) without holding it with their hands. If the object falls to the ground, the run must be started from the beginning.
Attention: Choose a route for the transport types that can be completed by the participants in terms of strength (without putting down the partner). For safety reasons, obstacles should be avoided.
Per group and depending on choice:
2 colouring sticks
1 Pedalo
1 ball (medicine/gymnastics ball)
1 Frisbee
Relay
Increase pulse
Group work
4-5 participants per group
Each participant in the group has to pass a course with three marker poles in a slalom run. The first pole after the start is approached from the left, the third pole is turned around and the centre pole is passed on the right. The handover takes place on the way back at the third or first pole of the slalom course with a pass of the frisbee to the next runner, who waits for the frisbee at the starting point (until successful or a maximum of three attempts).
Transport types:
- Pinch the frisbee between your knees
- Pinch the frisbee between your legs and hop along
- Complete the course in a four-foot gait (backwards), transporting the frisbee on your thighs or stomach
- Balance the frisbee on your head
- Transport the ball in or on the frisbee (depending on the top)
Per group:
4 colouring sticks
1 frisbee
1 ball (soft or tennis ball)
Relay
Increase pulse
Group work
4-5 participants per group
One runner jumps with the skipping rope around a turning point (e.g. colouring stick, marker cone or cone) or to the hall wall and back before handing the skipping rope to the next runner and sending them on their way. There are different ways of moving with the skipping rope to complete the course:
Single run:
- Skipping rope: right leg only (with/without intermediate step)
- Skipping rope: left leg only (with/without intermediate step)
- Skipping rope: Alternating right/left leg first (with/without intermediate step)
- Rope skipping: Two-legged
- Skipping rope: walking backwards
- Skipping rope between the knees
With a partner:
- One participant in a push-up position places their feet on the rope held by their partner (garette) and moves away with their hands. The participant who kept their feet in the air with the rope becomes the next runner (push-up position) during the handover.
Per group:
2 colouring sticks
1 skipping rope
Relay
Increase pulse
Group work
4-5 participants per group
One runner runs around a turning point (e.g. colouring stick, marker cone or cone) or to the hall wall and back before sending the next runner onto the track. There are different exercise variations with the ball:
Single run:
- Carrying the ball:
- Ball (e.g. medicine ball or gym ball) medicine ball or exercise ball) in a high hold
- Carry the ball on your thighs in a four-footed gait
- Tuck the ball between your feet and bounce
- Bounce the ball
- Dribble the ball with your feet
- Roll the ball with your hands
In a binomial:
- Tuck the ball between partners (hands must not hold the ball after the start)
Detachments: Run around the waiting group back to the next runner for the handover of the ball - roll the ball forwards between the legs - pass the ball forwards over the heads - stop the ball on one or between two lines, then handover by handshake to the next runner who picks up the ball.
Per group:
2 colouring sticks
1 ball (volleyball, football, basketball or handball)
1 medicine or exercise ball
Relay
Increase pulse
4-5 participants per group
One runner runs around a turning point (e.g. painting stick, marking cone or cone) or to the hall wall and back before sending the next runner onto the course.
A ball is also guided with the floorball or intercrosse stick.
Replacements:
Nordic walking poles: Run across the line with a handshake, around the group with a handshake, pass the sticks, etc.
Intercrosse/unihockey stick: From a defined line, a pass is played to the next participant in the group, run behind the group and pass the ball forwards between the legs or pass the ball behind the starting line.
Per group:
2 Nordic Walking poles
1 Intercrosse/Unihockey ball
1 Intercrosse/Unihockey stick
Relay
Increase pulse
4-5 participants per group
One runner runs around a turning point (e.g. colouring stick, marker cone or cone) or to the hall wall and back before sending the next runner onto the course. The course can be completed as follows:
- Balancing the ball on the racket
- Juggling the ball with the racket
- Bouncing the ball on the floor
- Rolling/guiding the ball along the floor
Returns: From a defined line, a pass is played to the next participant in the group, who catches the ball with the racket without it falling to the ground (until successful or a maximum of three attempts) - run behind the group and pass the ball forwards between the legs - pass the ball behind the starting line with the racket (without hands).
Per group:
2 colouring sticks
1 Smolball
Per participant:
1 Smolball bat
Relay
Forms of play / exercises
Group work
4-5 participants per group
A runner carries a ball in their hands and runs around a turning point (e.g. colouring stick, marker cone or cone) or to the hall wall and back before sending the next runner onto the track. Several runs are chosen per participant with different forms of locomotion (e.g. normal sprint, one-legged hopping on the right and left leg, running backwards).
Replacements: Run to the end of the waiting group: pass the ball forwards over the heads of participants - pass the ball forwards between the legs - pass the ball alternately over the head and between the legs
.Per group:
2 colouring sticks
1 ball (volleyball, softball)
Relay
Forms of play / exercises
Group work
4-5 participants per group
One runner runs around a turning point (e.g. colouring stick, marker cone or cone) or to the hall wall and back before sending the next runner onto the course. The course can be completed as follows:
- Balancing the ball on the racket
- Juggling the ball with the racket
- Bouncing the ball on the floor
- Rolling/guiding the ball along the floor
Returns: From a defined line, a pass is played to the next participant in the group, who catches the ball with the racket without it falling to the ground (until successful or a maximum of three attempts) - run behind the group and pass the ball forwards between the legs - pass the ball behind the starting line with the racket (without hands).
Per group:
2 colouring sticks
1 Smolball
Per participant:
1 Smolball bat
Relay
Forms of play / exercises
Group work
4-5 participants per group
One runner jumps with the skipping rope around a turning point (e.g. painting stick, marker cone or cone) or to the hall wall and back before handing the skipping rope to the next runner and sending them on their way. There are different ways of moving with the skipping rope to complete the course:
Single run:
- Skipping rope: right leg first only (with/without intermediate step)
- Skipping rope: left leg first only (with/without intermediate step)
- Skipping rope: alternating right/left leg first (with/without intermediate step)
- Skipping rope: two-legged
- Skipping rope: one-legged left
- Skipping rope: one-legged right
- Skipping rope: walking backwards
- Skipping rope between the knees
Note: if you make a mistake, return to the start or turnaround, but after 3 mistakes you can continue jumping in place. The forms of locomotion can also be combined (e.g. outward one-legged left - return one-legged right, outward two-legged - return sprint without jumping rope).
Per group:
2 colouring sticks
1 skipping rope
Relay
Increase pulse
Group work
4-5 participants per group
A runner carrying a ball in his hands runs along the course towards the turnaround point (marking cone). Halfway along the course there is an additional marking cone. The ball is deposited on this cone. The ball is then run around the turnaround. On the way back, the ball is picked up again before the next runner is sent onto the course.
Locomotion:
1st run = sideways steps / 2nd run = crossover run / 3rd run = sprint
Release:
Always run behind the waiting group. 1st release = pass the ball forwards between the legs / 2nd release = pass the ball forwards over the heads / 3rd release = pass the ball forwards alternately between the legs and over the heads.
Per group:
3 marking cones
Relay race
Basic training
Group work
Groups of 4
Relay race in teams of 4 in the arena: Each group appoints a starting runner who carries a handover stick/ribbon or similar. A runner from each team stands ready in each corner. The starting runner completes the first part of the course before handing over the baton/ribbon to the next runner, who in turn hands over the relay item to the next runner, etc. The starting runner has the task of handing over the baton/ribbon to the next runner. The starting runner has the task of counting how many times he/she has returned to the starting point in the specified time (number of laps). The sports director starts 2 runs of 9 minutes each with a break of 1-2 minutes between the runs (change of direction). The team goal for the second round is to complete more laps than in the first round.
Course: square (max. size of a football pitch). size of a football pitch)
Intensity level: 3 (medium)
HFmax: 80-90%
Speech rule: speak in full sentences
Variant:
The participants run at different speeds (e.g. participant A: intensity 3; participant B: intensity 2).
4 marking cones/caps
1 handover stick/tape
Sports manager:
1 stopwatch
Standing and prone position alternating
Power
Individual work


From the standing position, assume the prone position freely, observing the correct stance (see regulation 53.103: bend both knees simultaneously; kneel on the line of the hips; bend the upper body forwards and catch it with the weak hand; lie down without the weapon touching the ground, weapon and body form a line). Then stand up (reverse sequence of movements) and return to the standing position.
Attention:
The weapon is always pointed forwards.
1 pistol (neutralised)
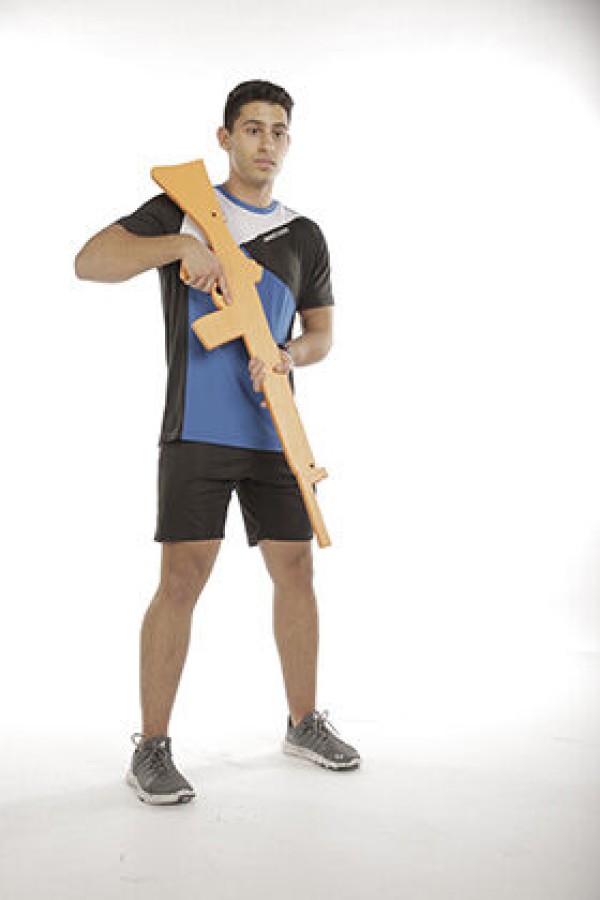
Standing and prone position alternating
Power
Individual work


From the standing position, assume the prone position freely, observing the correct stance (see regulation 53.096: bend both knees simultaneously; kneel on the line of the hips; bend the upper body forwards and catch it with the weak hand; lie down so that the weapon and the body form a line). Then stand up (reverse movement sequence) and return to the standing position.
Attention:
The weapon is always pointed forwards.
1 assault rifle (neutralised)
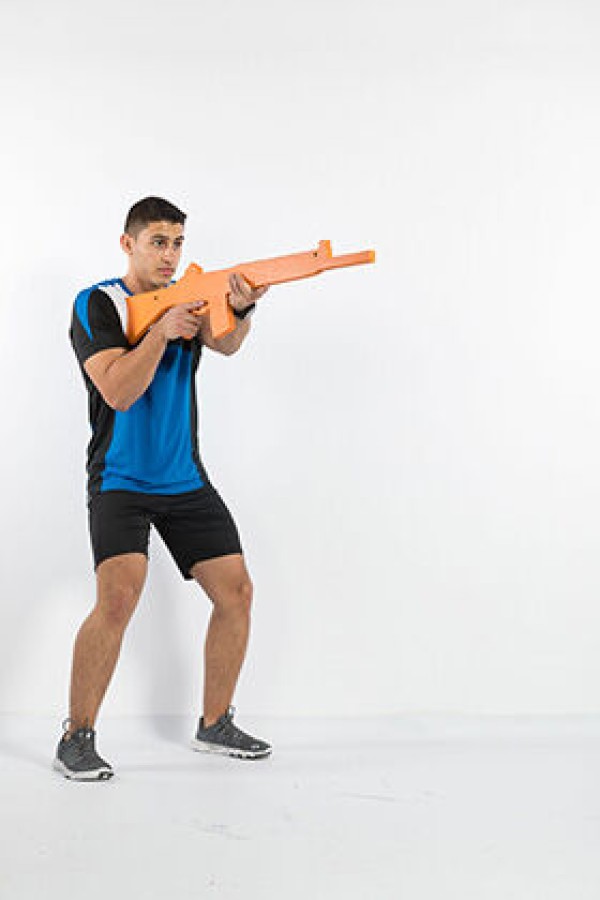
Alternating standing and crouching position
Power
Individual work


From the standing position, assume the crouching position, observing the correct stance (see regulation 53.096: bend both knees evenly, squat down; place feet flat on the ground; strike the weapon; both elbows are placed in front of the knees; the body is tilted slightly forwards). Then straighten up by stretching your legs and return to the standing position.
Attention:
The weapon is always pointed forwards.
1 assault rifle (neutralised)
Standing and kneeling position alternating
Power
Individual work


From the standing position, take up the position kneeling (on one knee), observing the correct stance (see regulation 53.103: take a step forwards with the weak leg over an imaginary line pointing from the tip of the strong foot to the target; bend both knees simultaneously; sit on the strong heel; bend the strong knee 45° from the direction of the shot; rest the weak elbow in front of or behind the weak knee). Then stand up by pushing off the front foot and return to the standing position.
Attention:
Weapon is always pointed forwards.
1 pistol (neutralised)
Standing and kneeling position alternating
Power
Individual work

From the standing position, assume the kneeling position, observing the correct stance (see regulation 53.096: take a step forward in front of the strong leg with the weak leg, crossing the imaginary line from the strong leg to the target; bend both knees simultaneously, sit on the strong heel; the strong knee is bent 45 degrees from the direction of the shot; support the weak elbow slightly in front of or behind the weak knee). Then stand up by pushing off the front foot and return to the standing position.
Attention:
The weapon is always pointed forwards.
1 assault rifle (neutralised)
Standing and kneeling alternately
Power
Individual work


From the standing position, assume the kneeling position (on both knees), observing the correct stance (see regulation 53.103: starting position is the standing position; straighten the back and bend both knees at the same time; go to the ground with both knees). Then return to the standing position.
Attention:
The weapon is always pointed forwards.
1 pistol (neutralised)
Standing and supine position alternating (left) ► turkish get up
Power
Individual work


From the lying position (supine position), you move through various intermediate positions to the upright position, whereby the main focus is on holding the weight (dumbbell or kettlebell) in one hand overhead in a stable position and always working with a stretched back.
As a starting position, the weight is held in a supine position with one arm (left) almost outstretched at chest height (arm pointing upwards), the leg (left) on the same side where the weight is held is bent (foot placed on the floor). Firstly, the shoulders are lifted using the forearm of the arm resting on the floor (right). Then rest the free arm on the hand to lift the whole upper body away from the floor. The hips are then pushed upwards and the outstretched leg (right) is pulled under the body and brought backwards into a kneeling position (half kneeling position with one hand resting on the floor). The arm that is currently still supporting you (right) is then finally lifted off the floor to a half-kneeling position with the upper body upright. A lunge is used to assume the final standing position. Reverse the sequence of movements to return to the starting position lying on the floor.
Starting position:
- Supine position
- Leg bent and positioned on the side of the weight
- Weight held in front of you with one arm almost straight (arm pointing firmly upwards)
- Abdominal and gluteal muscles are tensed
- Gaze is directed towards the weight
Final position:
- Stand upright with a straight back
- Stabilise the weight overhead with an almost outstretched arm
Attention:
This exercise places extremely high demands on mobility and stability, which is why it is only suitable for advanced exercisers. Distribute the weight over the entire foot during the movement sequence
1 dumbbell/kettlebell
Standing and supine position alternating (left) ► turkish get up
Power
Individual work


From the lying position (supine position), you move through various intermediate positions to the upright position, whereby the main focus is on holding the weight (dumbbell or kettlebell) in one hand overhead in a stable position and always working with a stretched back.
As a starting position, the weight is held in a supine position with one arm (right) almost outstretched at chest height (arm facing upwards), the leg (right) on the same side where the weight is held is bent (foot on the floor). Firstly, the shoulders are lifted using the forearm of the arm resting on the floor (left). Then rest the free arm on the hand to lift the whole upper body away from the floor. The hips are then pushed upwards and the outstretched leg (left) is pulled under the body and brought backwards into a kneeling position (half kneeling position with one hand resting on the floor). The arm that is currently still supporting you (left) is then finally lifted off the floor to a half-kneeling position with the upper body upright. A lunge is used to assume the final standing position. Reverse the sequence of movements to return to the starting position lying on the floor.
Starting position:
- Supine position
- Leg bent and positioned on the side of the weight
- Weight held in front of you with one arm almost straight (arm pointing firmly upwards)
- Abdominal and gluteal muscles are tensed
- Gaze is directed towards the weight
Final position:
- Stand upright with a straight back
- Stabilise the weight overhead with an almost outstretched arm
Attention:
This exercise places extremely high demands on mobility and stability, which is why it is only suitable for advanced exercisers. Distribute the weight over the entire foot during the movement sequence
1 dumbbell/kettlebell
Standing and supine position alternating (right) ► turkish get up
Power
Individual work


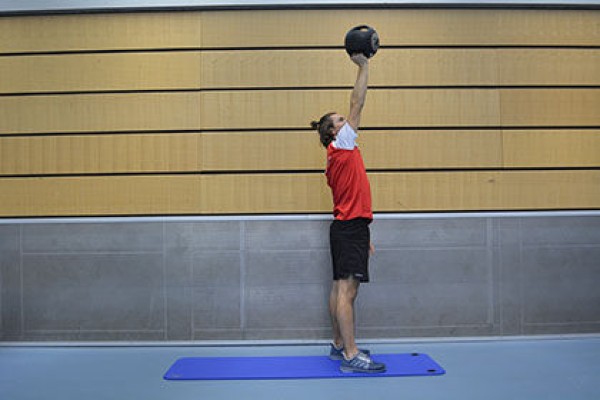
From the lying position (supine position), you move through various intermediate positions to the upright position, whereby the main focus is on holding the weight (dumbbell or kettlebell) in one hand overhead in a stable position and always working with a stretched back.
As a starting position, the weight is held in a supine position with one arm (right) almost outstretched at chest height (arm facing upwards), the leg (right) on the same side where the weight is held is bent (foot on the floor). Firstly, the shoulders are lifted using the forearm of the arm resting on the floor (left). Then rest the free arm on the hand to lift the whole upper body away from the floor. The hips are then pushed upwards and the outstretched leg (left) is pulled under the body and brought backwards into a kneeling position (half kneeling position with one hand resting on the floor). The arm that is currently still supporting you (left) is then finally lifted off the floor to a half-kneeling position with the upper body upright. A lunge is used to assume the final standing position. Reverse the sequence of movements to return to the starting position lying on the floor.
Starting position:
- Supine position
- Leg bent and positioned on the side of the weight
- Weight held in front of you with one arm almost straight (arm pointing firmly upwards)
- Abdominal and gluteal muscles are tensed
- Gaze is directed towards the weight
Final position:
- Stand upright with a straight back
- Stabilise the weight overhead with an almost outstretched arm
Attention:
This exercise places extremely high demands on mobility and stability, which is why it is only suitable for advanced exercisers. Distribute the weight over the entire foot during the movement sequence
1 dumbbell/kettlebell
Standwaage
Floor and apparatus gymnastics


Stepping position with a secure stance on the standing leg, rear leg only on tiptoe, arms held high, rear leg lifted backwards and upwards, upper body simultaneously tilted forwards, gaze directed forwards, arms stretched out to the side, rear foot raised at least to head height, standing leg stretched, body firmly tensed.
The participants practise the movement independently using series of pictures or based on the instructor's demonstration of the exercise. The instructor (or a partner) gives feedback, provides support and checks that the exercise is being performed correctly.
2 soft mats (small) - optional ► indoor version
1 row
outdoor:
turf field