Exercises (3161)
Alternating lateral bending of one leg in forearm support ► plank crunch
Power
Individual work


Underarm support, alternately bend one leg and move the respective knee sideways towards the elbow (do not lower the knee).
Attention:
Head, torso, hips and knees practically form a line (do not stretch your buttocks upwards or let them sag, tense your stomach).
Lighten:
Lower the knees less far forward; only hold the position; place one knee on the floor and only exercise one side (organisation: = 2 exercises, left/right side).
Harden:
Additional weight (on the back or legs); unstable support for the arms.
2 weight cuffs/1 weight vest/weight disc/sandbag ► making the exercise more difficult (additional weight)
1 balance cushion/balance board ► making the exercise more difficult (unstable surface)
Bending the arms sideways and forwards alternately in prone position ► lying back extension
Power
Individual work


Lie on your stomach with your arms stretched out in line with your body. Hold the pistol in both hands and point it forwards (do not rest your arms on the floor), raise your legs slightly, transfer the pistol to one hand and bring both arms back and bend them next to your head (elbows at shoulder height). Raise your upper body slightly, extend your arms forwards again and grasp the gun with both hands and point it forwards. Then transfer the pistol to the other hand and repeat the exercise.
Attention:
Do not lower your upper body completely.
Lighten:
Just hold the starting position.
Variant:
Gather your arms behind your back as straight as possible and move them forwards again to the starting position.
1 pistol (neutralised)
Alternately lowering and raising the bent legs to the side in the supine position ► twisting windmill / half wipers
Power
Individual work
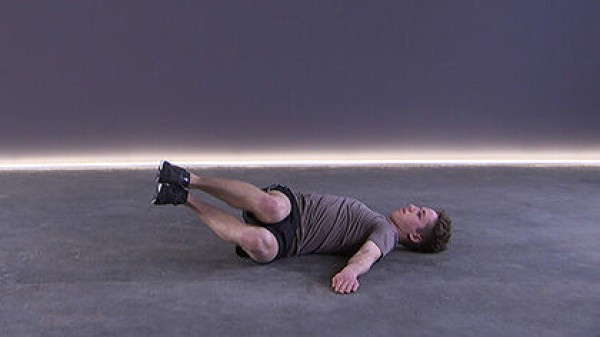

Lie on your back with your arms stretched out on the floor at shoulder height. Keep your legs together and bent in an upright position (thighs approximately 90 degrees, lower legs parallel to the floor), tilt your legs alternately to the left and right side (keep the angle of the legs constant).
Attention:
Do not put your legs down completely, keep your back in constant contact with the floor (consciously tense your abdomen, possibly place your hands under your back to control the position).
Lighten:
bend the legs more (knees closer to the body); only hold the position (without raising and lowering the legs) or lower the legs less.
Harden:
add weight to, between or on the legs; increase the angle of the legs (knees further away from the body) or even stretch the legs out.
2 weight cuffs/1 weight disc/(medicine) ball/sandbag ► Make the exercise more difficult (additional weight)
Lateral lowering and raising of the arms while standing
Power
Individual work

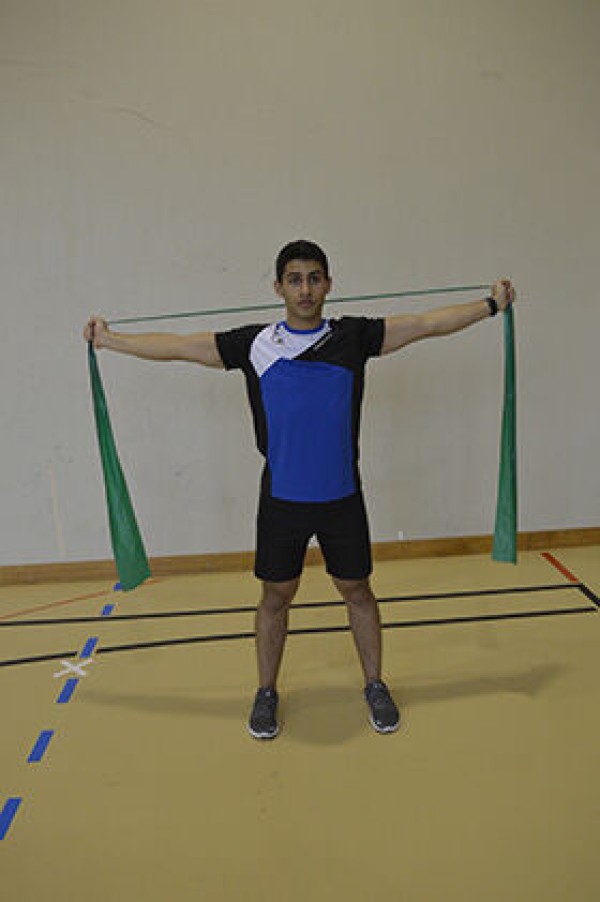
Stand upright, shoulder-width apart with your arms almost straight above your head in an upright position. Grasp the elastic band with your hands slightly wider than shoulder-width apart and, keeping your arms straight, lower your body sideways towards the T-position (squeeze your shoulder blades together) and return to the starting position.
Attention:
Do not arch your back (tense your torso), keep your shoulders deeply fixed/set.
Lighten:
Choose an elastic band with less resistance.
Harden:
Choose an elastic band with greater resistance.
1 elasticated rubber band
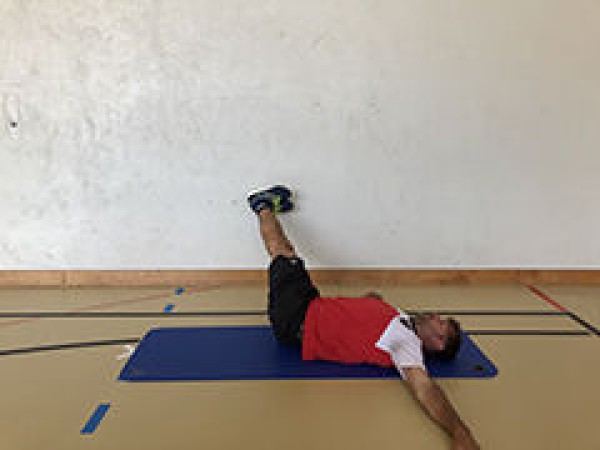
Lateral lowering and raising of the legs in supine position alternating ► twisting windmill / wipers
Power
Individual work


Lie on your back with your hands on a rung of the wall bars at head height. The legs are stretched out in an upright position and then moved from one side to the other towards the floor (you may need to wedge a ball between the legs).
Caution:
Do not lower your legs completely, keep them as straight as possible.
Make it easier:
Perform the exercise without the ball between your legs; lower your legs less.
Make it harder:
Add weight to your legs.
Variant:
In the centre position, lower your legs straight forwards and raise them back to the starting position.
1 wall bars
1 soft mat (small)
1 ball (e.g. football, volleyball, basketball)
2 weight cuffs/1 medicine ball ►Make the exercise more difficult (additional weight)
Lateral lowering and raising of the legs in supine position alternating ► twisting windmill / wipers
Power
Partner work


Trainee: Hold the legs of the standing partner in a supine position. Extend the legs vertically upwards and when the partner wants to push the legs towards the floor, hold against them/brake the downward movement so that the legs never touch the floor.
Partner: Hold the trainee's legs in a high position and push them sideways towards the floor.
Attention:
Always listen to/respond to your partner (adjust pressure/intensity). Keep your back in constant contact with the floor (no hollow back, consciously tense your stomach), do not put your legs down, keep your legs as straight as possible.
Lighten:
Just hold the position (legs stretched out in extension of the upper body), raise and lower your legs without additional impetus from your partner.
Harden:
Increased impulse from the partner; additional weight for the legs.
Variant:
The partner pushes the legs not only sideways but also frontally towards the floor (direction known to the exerciser or defined at random by the partner).
2 weight cuffs/ 1 (weighted) ball ► Make the exercise more difficult
Lateral lowering and raising of the legs in supine position alternating ► twisting windmill / wipers / windshield wipers
Power
Individual work


Lie on your back with your arms stretched out on the floor at shoulder height. Keep your legs together and stretched out in an upright position (pointing forwards diagonally upwards), tilt your legs alternately to the left and right side (keep your legs stretched out).
Attention:
Do not put your legs down completely, keep your back in constant contact with the floor (consciously tense your abdomen, possibly place your hands under your back to control the position).
Lighten:
Bend your legs (the closer your knees are to your body, the easier it is); lower your legs less.
Harden:
Additional weight on, between or on top of your legs.
2 weight cuffs/1 weight disc/(medicine) ball/sandbag ► Make the exercise more difficult (additional weight)
Jumping over an object from the side
Power
Individual work


Bipedal sideways jumps from one side of the long bench to the other.
Attention:
Keep your upper body upright.
Lighten:
Jump over a line (lower jump height); lower cadence.
Harden:
Jump over a wider element (upper part of the vault box); jump over a higher element (turn vault box element on its side); jump over a wider and higher element (2 vault box elements including upper part); higher cadence; additional weight (on the feet).
Variant:
Land and jump off with the outer leg only.
1 long bench
1-2 vaulting box elements (possibly incl. top section) ► Make the exercise more difficult
2 weight cuffs/1 weight waistcoat ► Make the exercise more difficult (additional weight)
Jumping over an object from the side with the upper body supported
Power
Individual work


Support your upper body with your arms on the long bench/swinging box top. Jump from one side of the long bench/swinging box top to the other with both legs.
Lighten:
Deeper cadence (pauses between jumps).
Harden:
Higher cadence; additional weight (on the legs); jump over a higher element (additional vaulting box element).
Variant:
Land and jump off with the outer leg only.
1 long bench or vaulting box top
1 vaulting box element ► Make the exercise more difficult (position)
2 weight cuffs/1 weight waistcoat ► Make the exercise more difficult (additional weight)
Side support (left)
Power
Individual work

Side support with outstretched (left) arm (possibly against a wall for the correct straight position), free (right) arm supported on the hip or held upright, hold position.
Attention:
Head, torso, hips and knees form a line (pelvis does not tilt backwards or forwards).
Lighten:
Knees on the floor.
Harden:
Additional weight (on the hips); unstable support (possible for both the arm and the legs).
1 weight vest/weight disc/sandbag ► make the exercise more difficult (additional weight)
1 ball/1-2 balance cushions/1 balance board ► make the exercise more difficult (unstable surface)
Side support (left)
Power
Individual work


Side support on the (left) outstretched arm with the legs in the foot supports (crossed, upper leg in front). Support your upper (right) arm on your hip or extend it vertically upwards, lift your pelvis off the floor and hold the position.
Attention:
Keep your body tensed, don't let your hips sag, keep your back straight and your arm under your shoulder.
Harden:
The further away your head is from the attachment point, the more challenging the exercise becomes.
Variant I:
Lift and lower your pelvis.
Variant II:
Alternately bring your upper arm under your body and stretch it upwards, accompanying the movement with your head.
1 sling trainer
Lateral support (right)
Power
Individual work

Side support with the (right) arm stretched out (possibly against a wall for the correct straight position), free (left) arm supported on the hip or held high, hold the position.
Attention:
Head, torso, hips and knees form a line (pelvis does not tilt backwards or forwards).
Lighten:
Knees on the floor.
Harden:
Additional weight (on the hips); unstable support (possible for both the arm and the legs).
1 weight vest/weight disc/sandbag ► make the exercise more difficult (additional weight)
1 ball/1-2 balance cushions/1 balance board ► make the exercise more difficult (unstable surface)
Lateral support (right)
Power
Individual work


Side support on the (right) outstretched arm with the legs in the foot supports (crossed over, upper leg in front). Rest your upper (left) arm on your hip or extend it vertically upwards, lift your pelvis off the floor and hold the position.
Attention:
Keep your body tensed, do not let your hips sag, keep your back straight and your arm under your shoulder.
Harden:
The further away your head is from the attachment point, the more challenging the exercise becomes.
Variant I:
Lift and lower your pelvis.
Variant II:
Alternately bring your upper arm under your body and stretch it upwards, accompanying the movement with your head.
1 sling trainer
Self-massage
Regeneration
Individual work
The participants massage their upper and lower legs as well as possible on their own. Massage in this order: stroking, kneading, stroking, pressing, stroking, walking, stroking.
Pro Tn:
1 soft mat (none)
Self-massage: chest muscles
Relaxation
Individual work
Starting position:
Position the ball next to the armpit and slightly under the collarbone with a block. Grasp the block with both hands by the sides or the notches.
Execution:
Apply pressure to the block (and therefore the ball) with your hand and work the entire pectoral muscle with circular movements. If a point in the chest muscles is particularly painful, the ball can be pressed into this point for several seconds to relieve tension. Then switch sides.
1 massage ball
Self-massage: sole of the foot
Relaxation
Individual work
Starting position:
Place one foot on the ball in a standing position.
Execution:
Place your body weight over the foot and move the ball back and forth on the sole of the foot using circular movements. If a point on the sole of the foot is particularly painful, the ball can be pressed into this point for several seconds to relieve tension. Then switch sides.
1 massage ball
Self-massage: gluteal muscles
Relaxation
Individual work
Starting position:
Sitting, place the ball under one side of the buttocks and support the hands next to the buttocks. Place the leg on the same side over the bent other leg.
Execution:
Move the ball back and forth under the buttocks by bending and stretching the bent leg (circular movements). The hands serve as a support. The pressure is relieved or intensified by slightly lifting the buttocks or pressing against the ball. If a point on the buttocks is felt to be particularly painful, the ball can be pressed into this point for several seconds to relieve tension. Then switch sides.
1 massage ball
Self-massage: Neck muscles
Relaxation
Individual work
Starting position:
Lying on your back, place the ball under your neck.
Execution:
Turn your head slowly to the left and right or make nodding movements. If one point of the neck muscles is particularly painful, the ball can be pressed into this point for several seconds to relieve tension
1 massage ball
Self-massage: upper arm muscles
Relaxation
Individual work
Starting position:
Position yourself sideways to the wall and wedge the ball between your upper arm and the wall (or on your side).
Execution:
Guide the ball along your upper arm by bending and stretching your legs. The intensity can be changed by applying more/less pressure with the upper body. If one point on the upper arm is particularly painful, the ball can be pressed on this point for several seconds to relieve tension. Then switch sides.
1 massage ball
Self-massage: Back muscles
Relaxation
Individual work
Starting position:
Standing, clamp the ball between your back and the wall (next to your spine).
Execution:
Roll the ball up and down your spine by bending and stretching your legs. The massage can be intensified by applying more pressure to the ball and reduced by reducing the pressure. Then perform the massage on the other side of the spine.
1 massage ball
Self-massage: Back muscles
Relaxation
Individual work
Starting position:
Sitting, place the ball in your lower back above the iliac crest and bend your legs slightly. Support your upper body with your arms as you lean backwards.
Execution:
Lean back slightly, lift the buttocks and slowly roll the ball forwards and backwards so that the entire lower back is covered (along the spine, not on the spine!). If one point of the back muscles is particularly painful, the ball can be pressed on this point for several seconds to relieve tension. Then switch sides.
1 massage ball
Self-massage: Shin
Relaxation
Individual work
Starting position:
Place the ball below the knee in a four-footed stance.
Execution:
Lift the tips of your toes off the floor and slowly move your leg forwards and backwards until the entire shin has been rolled. In addition, turn the heels inwards and outwards to cover the entire shin. Then switch sides.
1 massage ball
Self-massage: shoulder girdle/shoulder muscles
Relaxation
Individual work
Starting position:
Position the ball on your back below the shoulder blade. The legs are bent.
Execution:
Push the ball in all directions using the legs and lifting the buttocks. If a point around the shoulder blade is particularly painful, you can press the ball onto this point for several seconds to relieve tension. Move your arm slowly in all directions to intensify the pressure. Then switch sides.
1 massage ball
Self-massage: shoulder mobilisation
Relaxation
Individual work
Starting position:
Stand with your back to the wall and pinch the ball above your shoulder blade.
Execution:
Raise your arms sideways to shoulder height and bend them 90°. Apply pressure to the ball, moving your arm upwards along the wall and slowly back down again. Then lower the ball slightly and do the exercise again. Then switch sides.
1 massage ball
Self-massage: forearm muscles
Relaxation
Individual work
Starting position:
Sitting down, place one arm loosely on the knee and place the ball on the forearm.
Execution:
Move the ball in a circular motion over the forearm with your free hand while applying constant pressure. If a point on the forearm is particularly painful, the ball can be pressed on this point for several seconds to help release tension. Then switch sides.
1 massage ball